
Docker + GitHub Actions CI/CD: DevOps Pipeline cho web developer Việt từ zero đến deploy

5 tháng trước · 13 phút đọc
CI/CD không phải chỉ dành cho team lớn
Mình từng nghĩ CI/CD là thứ của Google hay Netflix - những công ty có hàng trăm engineer. Hồi đó, mỗi lần deploy là mình SSH vào server, kéo code, chạy npm install, restart service... và cầu trời không lỗi. Sai một bước là sập production, khách hàng báo không vào được web.
Thực ra với Docker và GitHub Actions, bạn có thể dựng một pipeline hoàn chỉnh trong một buổi chiều - miễn phí với mức dùng cơ bản. Đây không phải lý thuyết: 0.09% (GitHub Pricing Changes for GitHub Actions) developer cá nhân và startup nhỏ đang dùng GitHub Actions free tier mà không phát sinh chi phí thêm.
Bài này mình sẽ đi qua toàn bộ pipeline: từ Docker multi-stage build, GitHub Actions workflow cho test/lint/build/deploy, cách quản lý secrets an toàn, tích hợp Vercel preview, monitoring với Sentry, đến mấy trick tối ưu chi phí thực tế cho startup Việt.
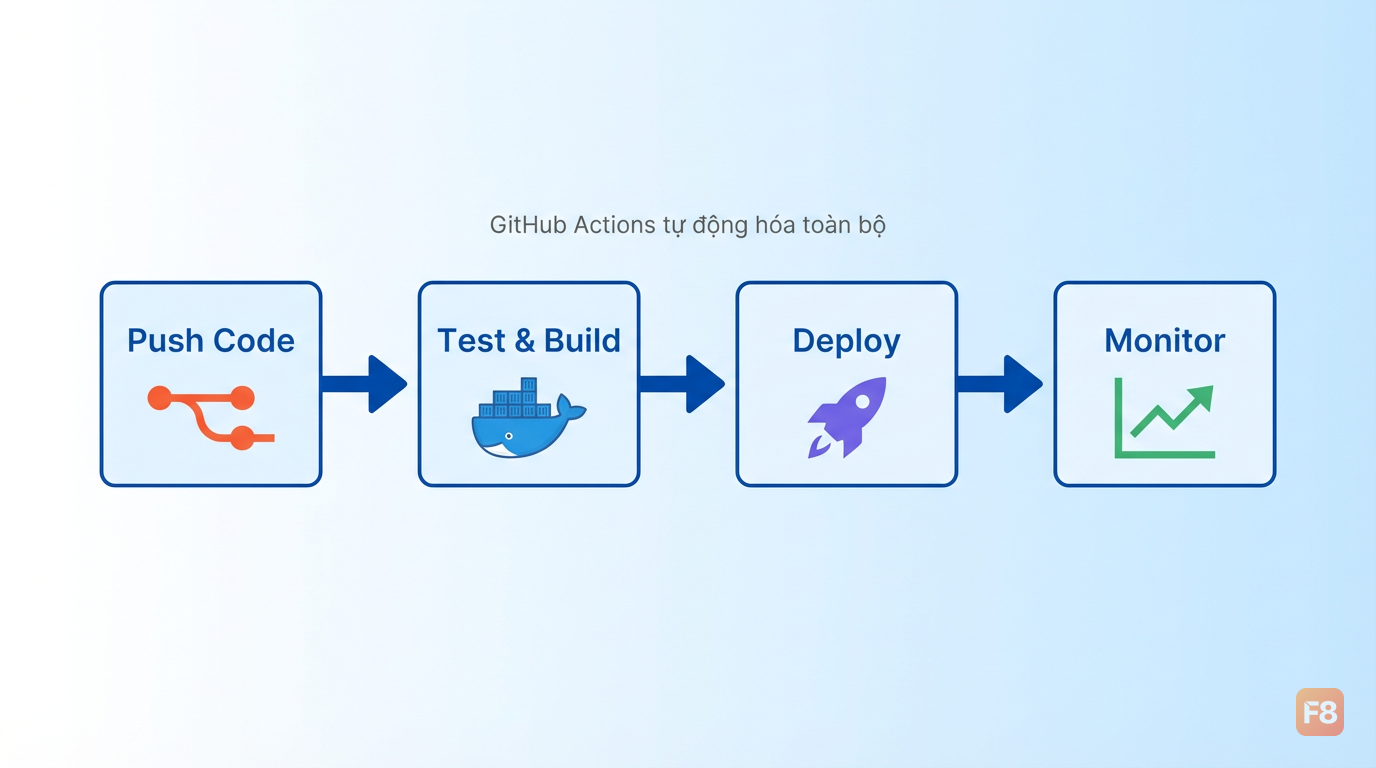 Pipeline hoàn chỉnh từ push code đến production - không cần SSH thủ công nữa
Trước khi bắt đầu, nếu bạn chưa quen với Terminal và Linux commands, khóa Làm việc với Terminal & Ubuntu sẽ giúp bạn đỡ bỡ ngỡ hơn nhiều khi setup các bước bên dưới.
Docker multi-stage build: nhỏ hơn, nhanh hơn, an toàn hơn
Vấn đề với Docker image thông thường? Bạn cài hết dev dependencies vào image production. Node.js image đầy đủ nặng node:20 full ~1GB (or ~380MB compressed), node:20-alpine ~130MB (or ~55MB compressed) ([OneUptime blog & Minimus](https://oneuptime.com/blog/post/2026-02-02-docker-images-best-practices/view & https://www.minimus.io/post/choosing-the-best-node-js-docker-image)), trong khi app thực ra chỉ cần runtime.
Multi-stage build giải quyết chuyện này bằng cách tách biệt môi trường build và runtime:
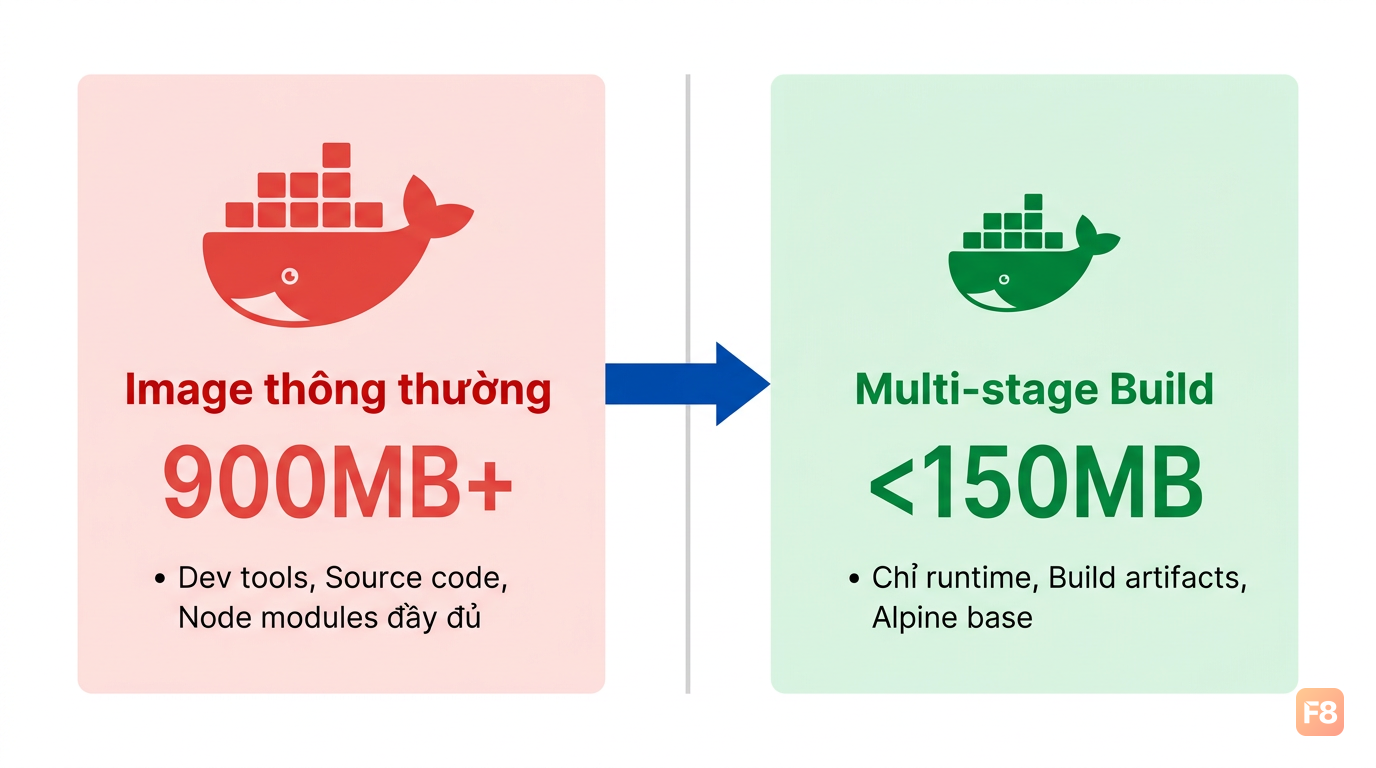 Stage builder nặng nhưng chỉ tồn tại trong quá trình build - image production cuối cùng gọn nhẹ
Ba điểm đáng chú ý trong Dockerfile trên:
Layer caching: Copy package.json trước, code sau. Docker chỉ re-run npm ci khi dependencies thay đổi, không phải mỗi lần bạn sửa code. Build time giảm đáng kể từ lần thứ 2 trở đi.
Non-root user: Chạy app với user bình thường thay vì root. Nếu container bị compromised, attacker cũng không có full quyền hệ thống.
Alpine base: node:20-alpine thay vì node:20. Alpine Linux chỉ khoảng 5MB base image so với ~900MB của Debian. Image cuối cùng của bạn có thể dưới 150MB so với 1GB+ nếu không tối ưu.
Để build và test local:
GitHub Actions workflow: test, lint, build tự động
Bạn có bao giờ merge code mà không biết nó có pass test không? Với GitHub Actions, mỗi lần push hoặc tạo PR đều kích hoạt pipeline tự động.
Tạo file .github/workflows/ci.yml:
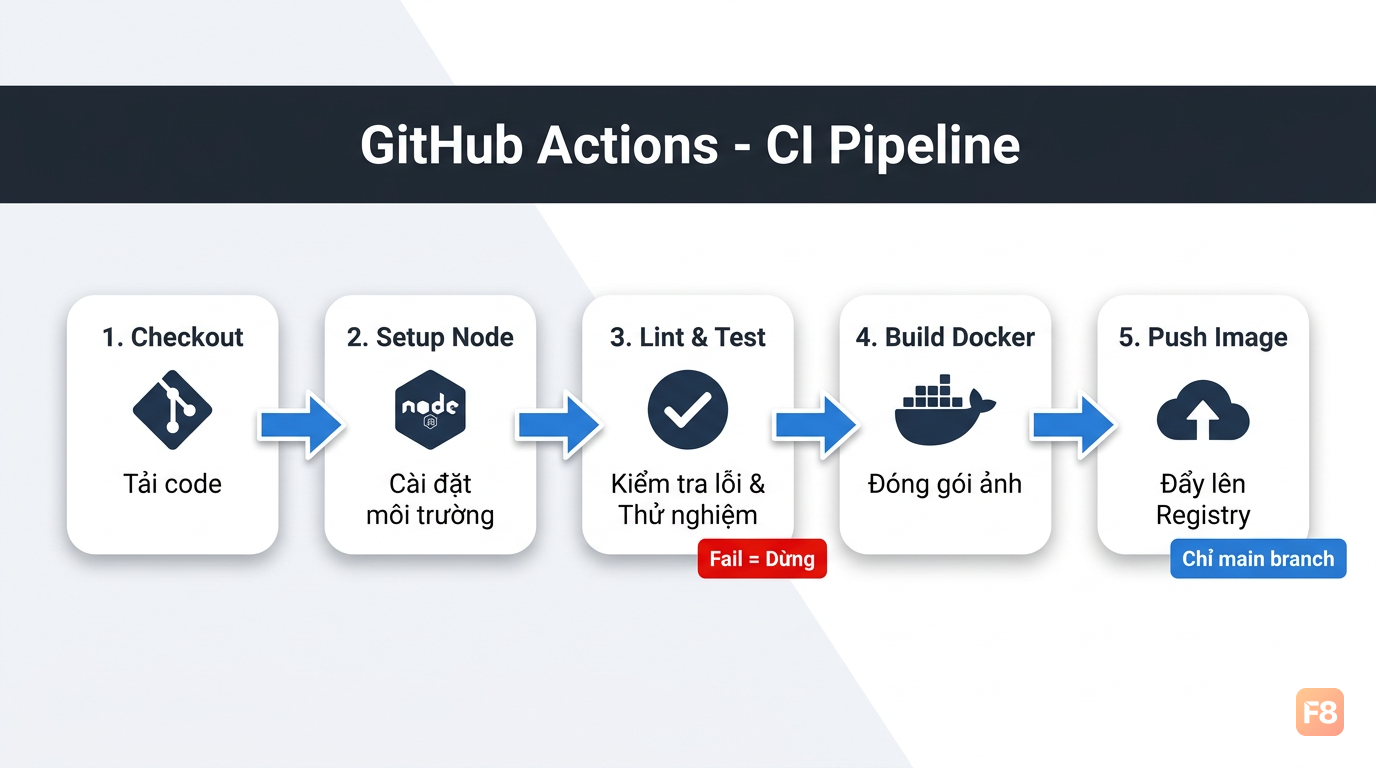 Mỗi PR tự động có status check - không thể merge nếu test fail
Một vài điểm quan trọng trong workflow này:
npm ci thay vì npm install: ci đọc package-lock.json chính xác, không cập nhật dependencies. Đảm bảo môi trường CI giống hệt máy bạn.
Cache node_modules: Dòng cache: 'npm' tiết kiệm 1-2 phút mỗi lần chạy. Với 50 lần push/tháng, đó là khoảng 91.5 phút (michalskorus.pl blog (pnpm vs npm benchmark)) phút CI minutes tiết kiệm được.
Tag bằng commit SHA: ${{ github.sha }} làm tag image thay vì chỉ dùng latest. Bạn có thể rollback về bất kỳ commit nào chỉ bằng cách deploy lại image cũ.
Điều kiện push: if: github.ref == 'refs/heads/main' - chỉ push image lên registry khi merge vào main, không phải mỗi lần push feature branch.
Secrets management: đừng để credentials lộ trên GitHub
39 million (GitHub blog post) vụ lộ credentials trên GitHub đến từ developer vô tình commit file .env hoặc hardcode API key trong code. Đây là lỗi cơ bản nhưng hậu quả rất nặng - từ bill AWS vài nghìn đô đến mất dữ liệu khách hàng.
GitHub Actions có hệ thống Secrets riêng. Vào Settings > Secrets and variables > Actions trong repo và thêm:
DOCKER_USERNAME=your-dockerhub-username
DOCKER_PASSWORD=your-dockerhub-token  # Dùng token, không phải password
DOCKER_IMAGE=username/my-app
SENTRY_DSN=https://[email protected]/yyyy
DATABASE_URL=postgresql://...
Secrets trong GitHub Actions được mã hóa, không hiển thị trong logs dù bạn cố echo ${{ secrets.DATABASE_URL }} - nó sẽ hiện ***.
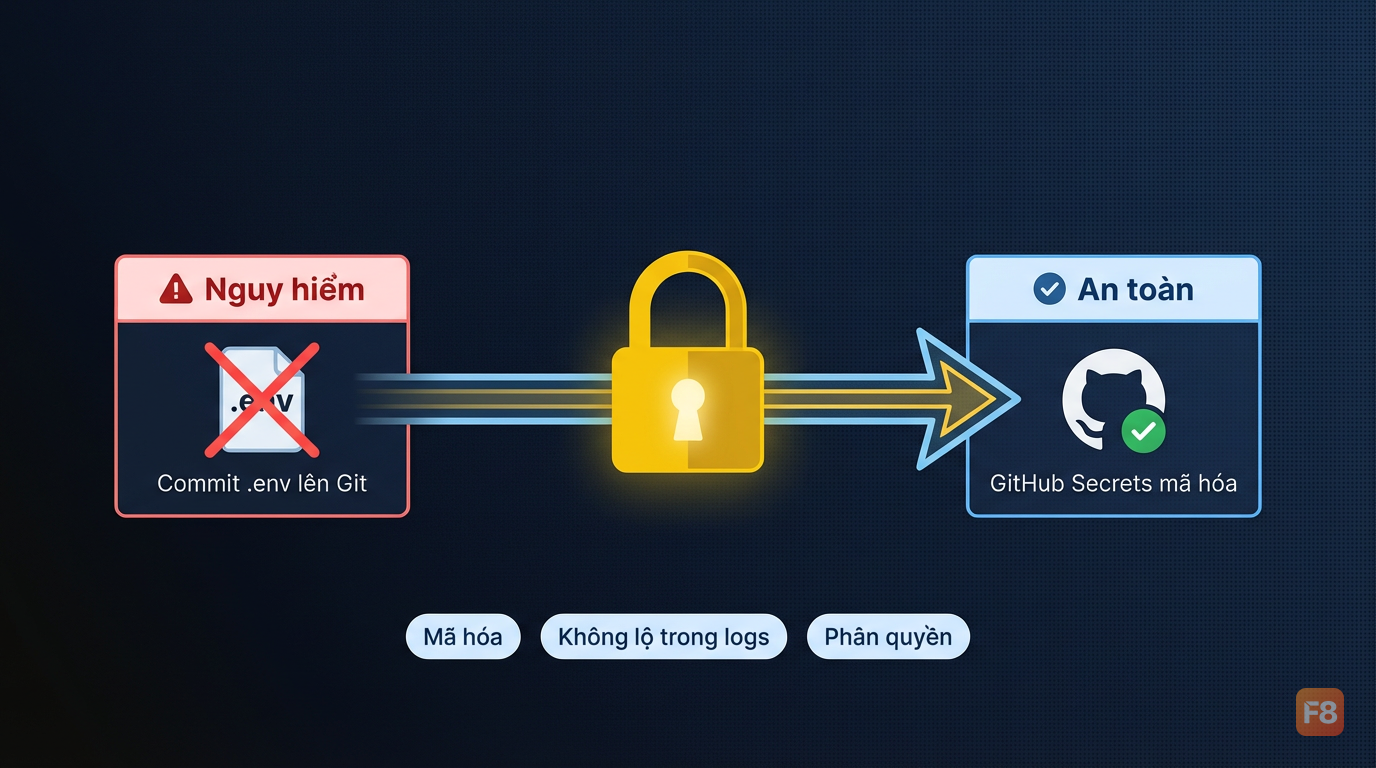 Secrets mã hóa trong GitHub, không bao giờ lộ trong logs hay giao diện
Một pattern tốt hơn cho production là dùng environment secrets thay vì repo secrets:
Environment secrets cho phép bạn có secrets khác nhau cho staging và production, đồng thời cấu hình required reviewers - ai đó phải approve trước khi deploy production. Với startup Việt, đây là cách miễn phí để có approval workflow mà không cần tool trả tiền.
Với .env local: thêm vào .gitignore ngay từ đầu và dùng .env.example chứa tên biến (không chứa giá trị) để làm template cho team.
Preview deployments với Vercel và Netlify
Mỗi PR có một URL preview riêng để test - đây là tính năng mình thích nhất khi làm việc theo team. Không cần deploy lên staging thủ công, không cần review code trên màn hình đen.
Vercel tích hợp GitHub tự động: connect repo, mỗi PR Vercel tự build và comment URL preview vào PR. Setup chỉ mất 5 phút qua giao diện.
Nếu bạn cần kiểm soát nhiều hơn, thêm vào GitHub Actions:
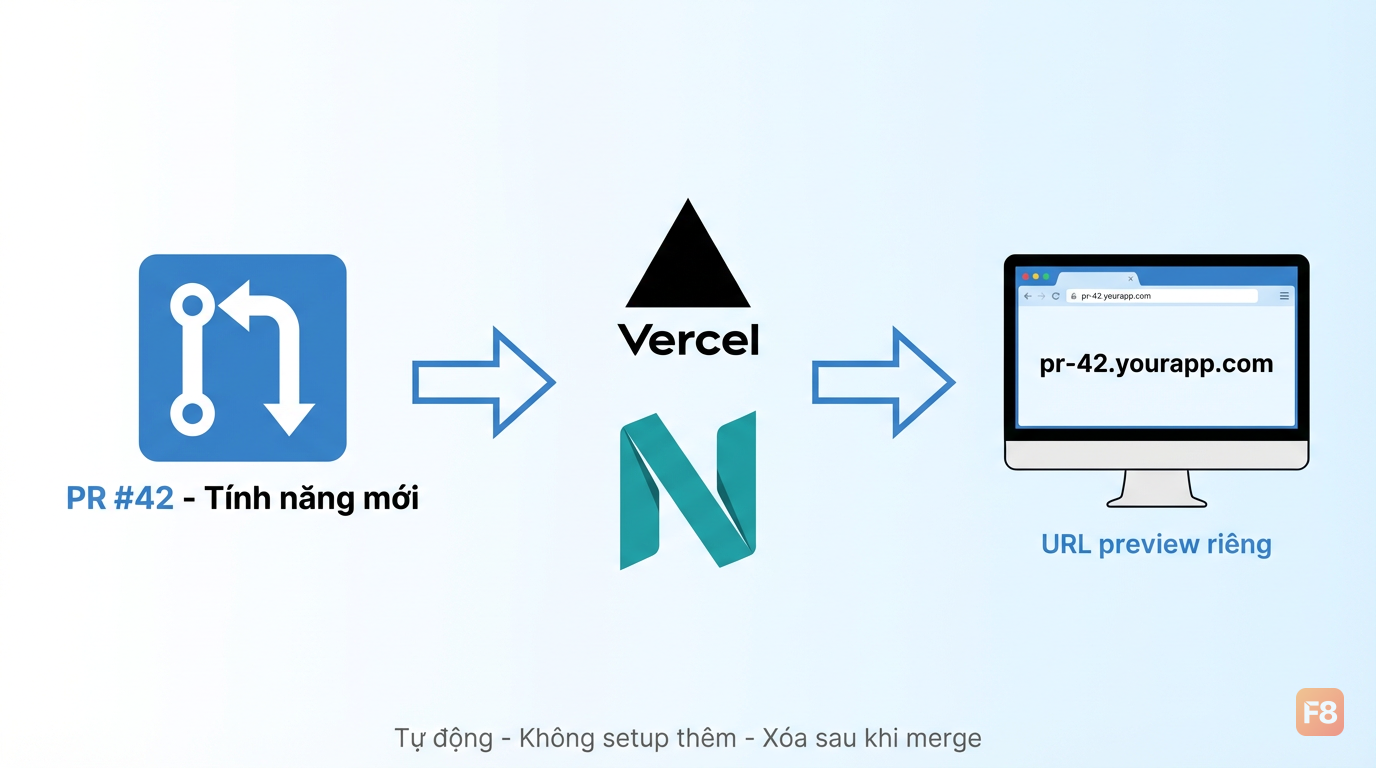 Preview URL riêng cho mỗi PR - designer và khách hàng test trực tiếp, không cần chờ merge
Netlify có approach tương tự với Netlify CLI:
Chọn Vercel hay Netlify? Mình thích Vercel hơn cho Next.js vì tích hợp Edge Functions và Image Optimization sẵn. Netlify phù hợp hơn với static site thuần hoặc khi bạn cần form handling tích hợp. Với free tier, cả hai đều đủ dùng cho startup giai đoạn đầu.
Free tier của Vercel cho phép 100 GB/month (flexprice.io/blog/vercel-pricing-breakdown) deployments/tháng với bandwidth và build time cơ bản. Đủ để run một vài project side hustle song song.
Monitoring với Sentry: biết lỗi trước khi khách hàng báo
Deploy xong rồi... rồi sao? Không có monitoring thì bạn chỉ biết app lỗi khi khách hàng nhắn Zalo. Không lý tưởng.
Sentry bắt lỗi runtime và gửi thông báo ngay khi xảy ra - stack trace, user bị ảnh hưởng, context đầy đủ. Free tier cho hàng nghìn errors/tháng, đủ cho startup giai đoạn đầu.
Tích hợp vào Next.js/React:
Wizard sẽ tạo các file cấu hình cần thiết. Thêm DSN vào GitHub Secrets như đã nói ở phần trước:
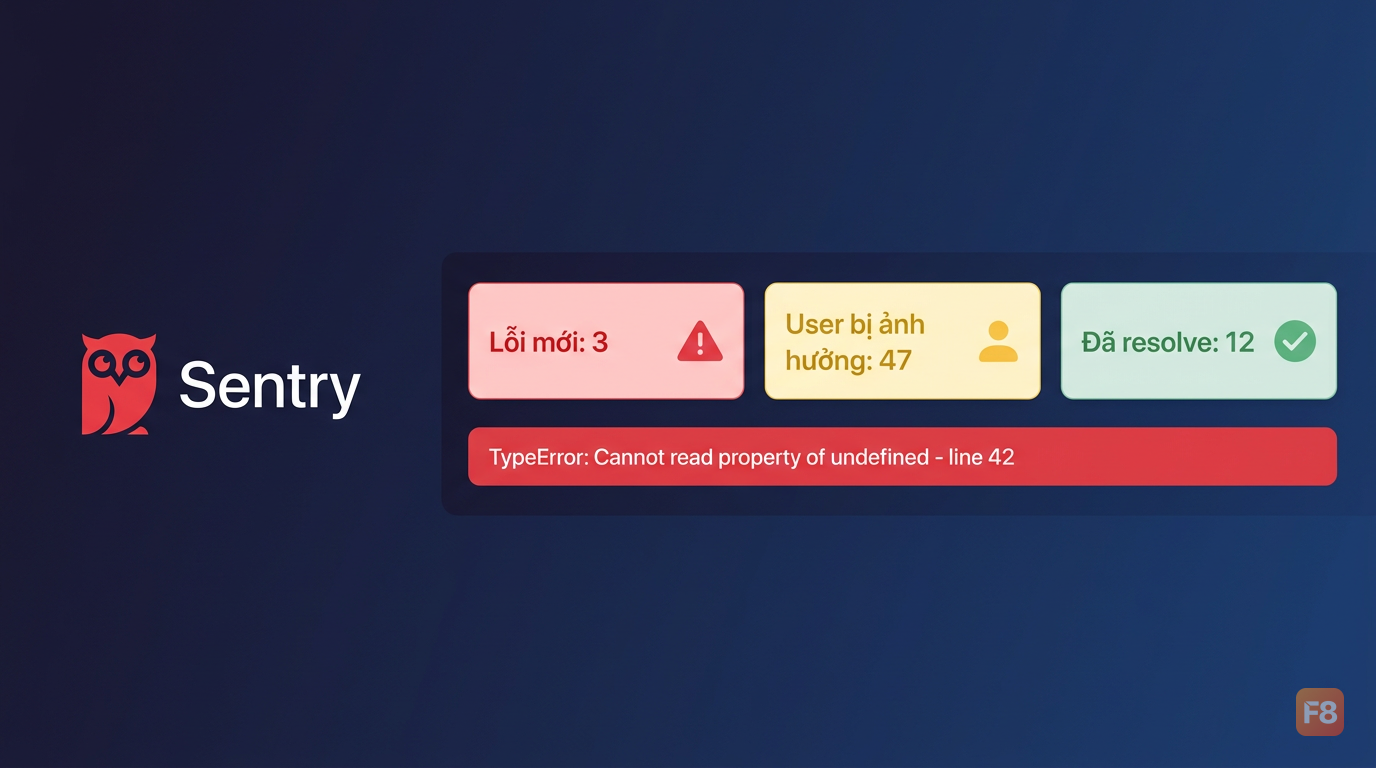 Sentry hiển thị lỗi kèm stack trace và số user bị ảnh hưởng - biết ngay cần ưu tiên fix cái gì
Trong GitHub Actions, upload source maps để Sentry hiển thị dòng code gốc thay vì minified:
Khi fix bug, Sentry sẽ tự động resolve issue nếu bạn dùng release tracking. Khách hàng không cần báo nữa - bạn đã biết và fix rồi.
Cost optimization cho startup Việt: chạy CI/CD gần như miễn phí
GitHub Actions free tier cho public repos là không giới hạn. Với private repos: 2,000 minutes (Get AI Perks) minutes/tháng miễn phí. Đủ cho team 2-3 người làm việc bình thường.
Mấy trick tiết kiệm CI minutes mình đang áp dụng:
1. Cache thông minh
Cache chỉ invalidate khi package-lock.json thay đổi. Tiết kiệm 2-3 phút mỗi job.
2. Chỉ chạy tests liên quan
3. Parallel jobs thay vì sequential
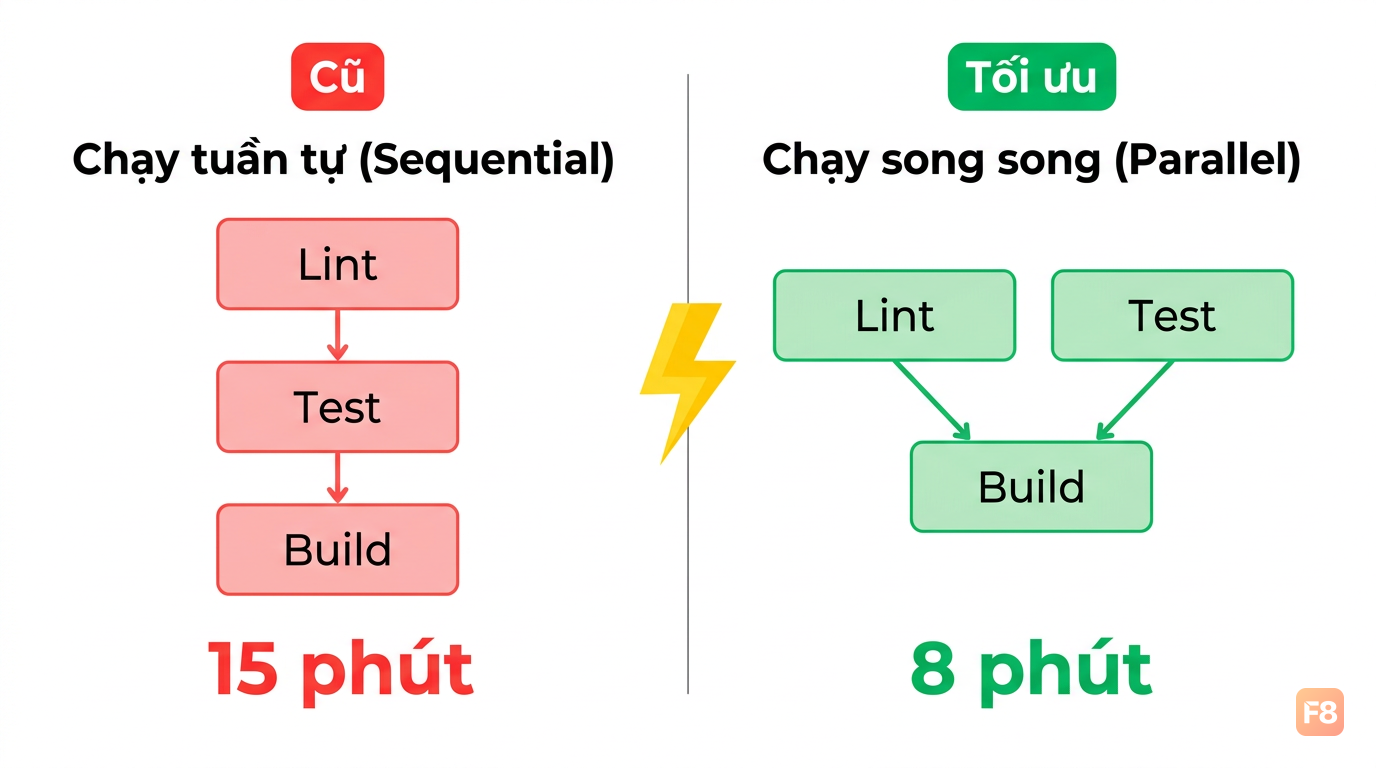 Chạy song song giúp tổng thời gian pipeline ngắn hơn dù tốn nhiều minutes hơn - đánh đổi đáng giá
4. Self-hosted runner - đây là game changer cho startup Việt. Dùng một VPS DigitalOcean $6/tháng hoặc Oracle Cloud free tier làm runner, GitHub Actions không tính minutes. Phù hợp khi team lớn hơn và private repos nhiều.
Tổng chi phí thực tế cho một startup nhỏ: Docker Hub free (1 private repo), GitHub free tier (2,000 minutes), Vercel/Netlify free tier, Sentry free tier. Gần như $0/tháng cho cả infrastructure CI/CD.
Bạn có thể tải checklist đầy đủ để setup pipeline từng bước tại đây: Checklist CI/CD Pipeline Setup
Full workflow: kết nối tất cả lại
Giờ ghép tất cả thành một file workflow production-ready:
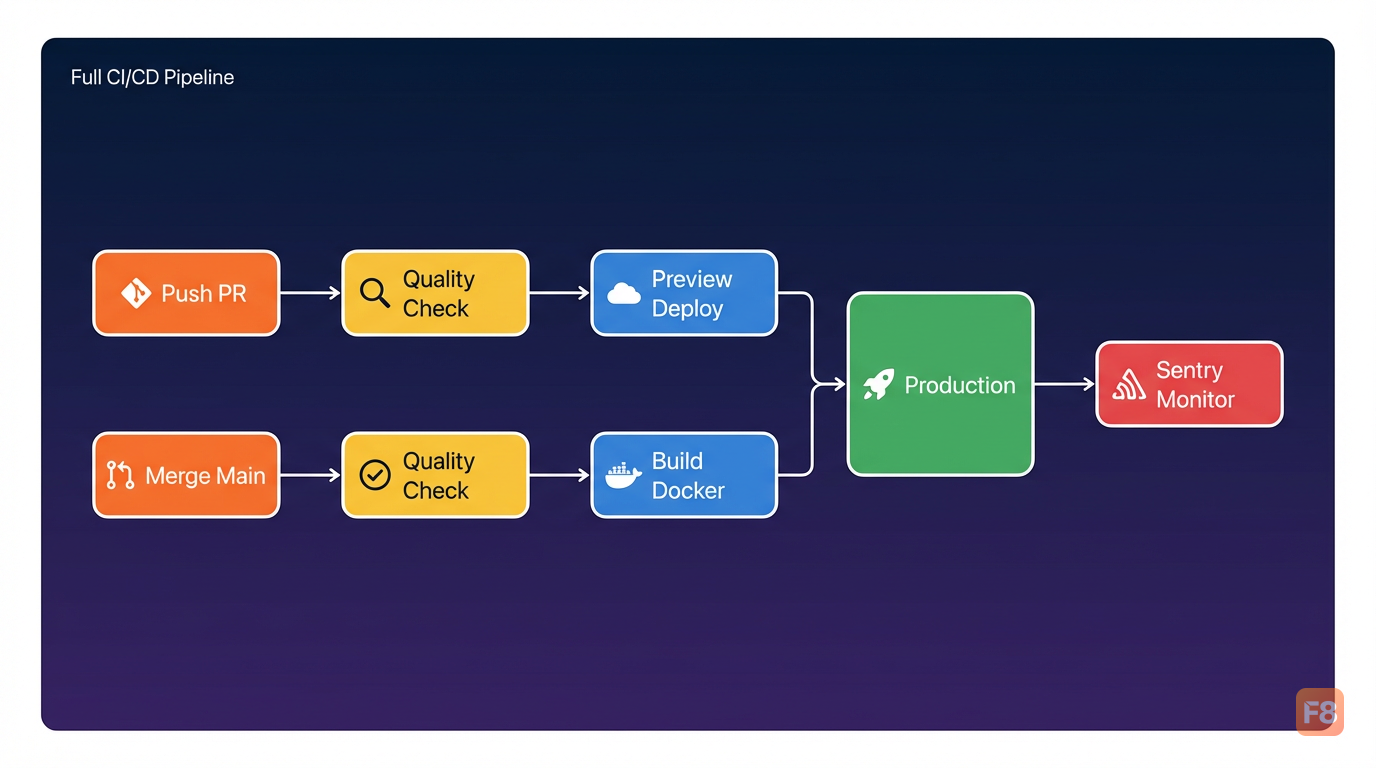 Toàn bộ pipeline trong một file - từ test đến monitor, tự động hoàn toàn
Pipeline này xử lý 3 tình huống:
- Push feature branch: không làm gì (chỉ trigger khi push lên main hoặc PR vào main)
- Tạo PR vào main: chạy quality checks → deploy preview
- Merge vào main: chạy quality checks → build Docker → deploy production → upload source maps
Giờ thì bạn đã có một CI/CD pipeline hoàn chỉnh. Bước tiếp theo:
- Fork hoặc tạo repo mới, thêm file
.github/workflows/ci.yml - Thêm secrets vào GitHub Settings
- Connect Vercel/Netlify với GitHub repo
- Tạo project Sentry và lấy DSN
- Push một commit và xem pipeline chạy
Mình phải mất vài tuần mày mò mới tổng hợp được flow này. Bạn có câu hỏi gì khi setup, drop comment - mình hay check.